Multi-tenancy in Kubernetes presents various complex challenges, including security, fairness, and resource allocation. This blog discusses the challenges associated with multi-tenancy and the technology choices made for a Kubernetes-based learning platform called Labs4grabs.io. I will explore the requirements, benefits, and drawbacks of two key technologies: vCluster and Kubevirt. These technologies were experimented with during the development of the backend for Labs4grabs.io. I will also explain why I ultimately decided to completely abandon vCluster, despite its brilliance.
About Labs4grabs.io
My platform is a Kubernetes learning platform that aims to simulate real-world problems in a lab environment. However, people are required to research and solve problems on their own with minimal guidance, aside from a brief description and a few hints per lab.
The lab content is based on real issues I encountered during my work as a Kubernetes engineer for Berops, as well as my previous experience in the field.
 Challenges are started directly from Slack.
What is multi-tenancy?
Kubernetes multi-tenancy is like managing an apartment building where different tenants share space. Each tenant needs their own space like bathroom, kitchen and bedroom and energies such as water, gas, electricity. But the most important thing is that the apartment tenants cannot access others energies or space. Also each tenant would be deeply disturbed if other tenants accessed their personal space. That means reduced quality of life for other tenants.
The same goes for Kubernetes tenants, they cannot touch each others resources, network bandwidth and so on. That would mean reduced quality of life for people wanting to improve their Kubernetes skill on my platform. Additionally, there’s other, most important component different from apartment tenants, and that’s the host system.
It would be the biggest disaster if tenants in a Kubernetes environment were able to break out of tenant environment and freely access the host system, affecting other tenants, using entire cluster compute power to mine crypto or else. That’s something that I was the most worried about when choosing the correct multi-tenancy technology when engineering Labs4grabs.io tenant environments.
💡 Note on host platform: I have chosen Kubernetes as a platform to host the tenant environments. Kubernetes has scheduling, networking, storage management, security features, observability tooling, and most importantly it has great community behind any question that I might have.
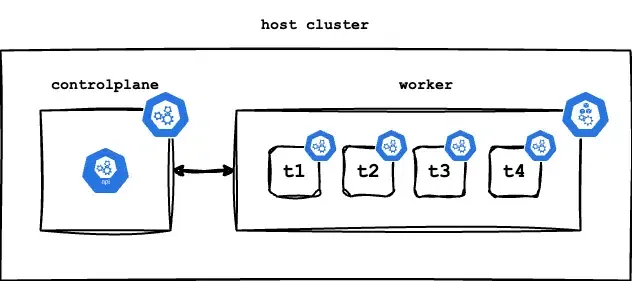
Host Kubernetes cluster with tenants deployed on worker.
Multi-tenancy challenges
When choosing and testing the right solution, there were a few factors that I had to consider:
- Security: It is important to consider the security implications when providing compute power and granting root access to users.
- Learning content: The availability of learning content may be limited when using certain solutions for the tenants.
- Resource consumption: Some solutions consume more resources, which can reduce the density of tenants on the host cluster.
- Time to provision: Certain solutions may take longer to start the lab compared to others.

Host Kubernetes cluster where a student cannot access the control plane of the host cluster directly but can access their own claimed environment freely.
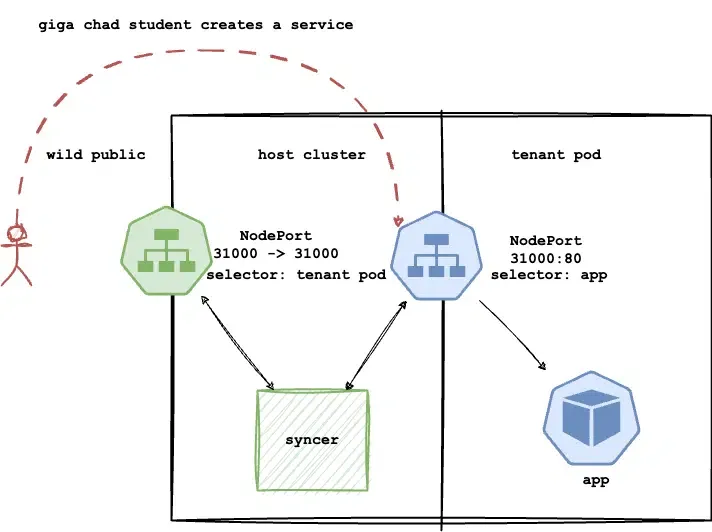
The easiest form of multi-tenancy would be to provision a new Kubernetes user for each student, providing them with their own certificates and keys to access the host cluster namespace. This solution is simple but also poses significant risks. It would require students to access their labs environment through the kube API server of the host cluster. However, this approach could lead to issues such as students creating an excessive number of NodePort services, degrading the experience for other students, or flooding the API server with millions of requests, impacting performance for legitimate users.
While implementing policy engines like Kyverno or Gatekeeper could help prevent users from violating certain rules, it would require extensive trial and error to configure them correctly for each individual lab. Moreover, these policies may restrict students from creating their own namespaces, accessing the root file system, or deploying privileged containers, which are important aspects of learning Kubernetes.
vCluster
vCluster is a Kubernetes cluster that runs on top of host Kubernetes clusters. Instead of having their own node pools or networking, vCluster schedules workloads inside the host cluster while maintaining their own control plane.
vCluster was an amazing solution for my multi-tenancy problem. It offered speed, better security, and ease of use. Its standout feature was the syncer, which replicated student-created resources from tenant environments onto the host cluster. You could specify which resources to replicate and how many of them to replicate. This feature was a game-changer for the content I could provide to students.
💡 For example, in the first intermediate level lab, titled “Debugging a Python Flask application,” vCluster syncer was used to allow students to create an ingress resource and make their deployed application publicly available.
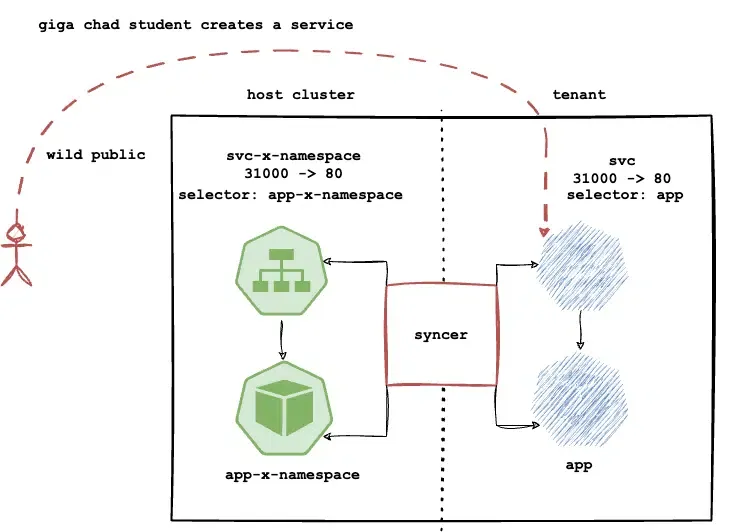
vCluster creates a fake service and pod on the tenant that points to the pod scheduled on the host cluster.
Demo VCluster
In this demo, we will create a basic vCluster tenant in the student namespace. We will then create an NGINX pod and expose it using a NodePort service. This service will be replicated to the host cluster, allowing the NGINX pod to be accessible from the outside world via my host’s public IP.
- Create namespace student with a privileged pod security admission.
---
apiVersion: v1
kind: Namespace
metadata:
  name: student
  labels:
    pod-security.kubernetes.io/enforce: privileged
- Create vCluster environment:
vcluster create tenant -n student --connect=false
- All pods running in the vCluster tenant:
$ vcluster connect tenant --namespace student -- kubectl get pods -A
NAMESPACE     NAME                       READY   STATUS    RESTARTS   AGE
kube-system   coredns-5c96599dbd-fsmwj   1/1     Running   0          116s
- Creating a simple nginx pod inside a tenant environment, then exposing it via NodePort and accessing it via a public IP address of my host Kubernetes node.
$ vcluster connect tenant --namespace student -- kubectl run pod nginx --image nginx
service/nginx exposed

$ vcluster connect tenant --namespace student -- kubectl expose pod nginx --type=NodePort --port 80
service/nginx exposed

$ kubectl get service -n student
NAME                                TYPE        CLUSTER-IP      EXTERNAL-IP   PORT(S)                  AGE
....
nginx-x-default-x-tenant            NodePort    10.43.229.163   <none>        80:**31871**/TCP             2m36s

$ curl $HOST_PUBLIC_IP:31871
<!DOCTYPE html>
GENERIC NGINX OUTPUT
</html>
💡 You can connect to vCluster without the use of vcluster command via a public kubeconfig, which was a requirement for my labs as students cannot be required to install vCluster cli and expect to have a “real Kubernetes experience”.
Advantages
- Syncer syncer syncer! Other solutions did not have the ability to provide public networking content by syncing to host cluster, I would have to program my own solution.
sync:
services:
  enabled: true
ingresses:
  enabled: true
persistentvolumeclaims:
  enabled: true
- vCluster is lightweight compared to virtual machines, so I can have better lab density on my hardware.
- Fast boot up since this vCluster is just few containers, it takes few seconds to provision.
- I do not have to use bare metal to host my labs, I could use virtual machines to host my vCluster tenants and use all benefits of scalable virtual machines.
Cons
- It does not provide visibility of core components. If you connect to vCluster, you won’t see the API server, scheduler, or controller manager. This limitation prevents core Kubernetes component content.
- vCluster does not allow having more nodes than your host cluster. This limitation prevents advanced scheduling content.
- I envisioned the platform to include content that can simulate scenarios such as broken operating system components, broken kubelets, networking bridge misconfigurations, broken DNS, or broken control planes. However, all of these scenarios would require SSH access to the tenant environment, which vCluster and containers in general were not designed to support.
In summary, the limitations of vCluster would significantly restrict certain content and scenarios in the learning platform that I wanted to offer to my students. While the syncer did enable access to some content that other solutions could not, it would also block much more content than it allowed, which was not aligned with my goals for the platform. Additionally, I could still explore the possibility of developing a custom syncer to replicate the functionality of vCluster’s syncer on a smaller scale. Therefore, I have abandoned vCluster and decided to go with virtualization.
Firecraker and Kata containers
An overview of two technologies, Firecracker and Kata containers, that enable the Firecracker runtime in Kubernetes. I looked into and experimented with these technologies, but decided not to use Kata containers because it required additional configuration for the Firecracker runtime, specifically with device mapper, which I wasn’t comfortable with. There were also extra steps to configure SSH connections into the Firecracker containers, which would result in a large container that may not achieve my desired outcome: a basic Kubernetes cluster on a complete operating system which I can break however I want.
Kubevirt
Considering the limitations of vCluster regarding learning content options it lacks, the research pointed towards virtualization. This approach offers security and complete separation from the host system, allowing for the use of a full operating system and unlimited learning content.
Fortunately, there are two virtualization technologies available for use in Kubernetes: Kubevirt and Virtlet.
- Virtlet seems to have been abandoned, with the last commit made 4 years ago at the time of research.
- Kubevirt had excellent documentation and was regularly updated, with the last commit made just a few hours ago at the time. So, the choice was clear!
Demo Kubevirt
Before following up the demo you will need to install Kubevirt alongside QEMU hypervisor as per this guide.
The installation of the actual lab environments is more complicated than vCluster due to userdata scripts and storage considerations, but I’ll spare you the details and focus on the most important aspects. In this demo I’ll use a generic container disk image.
The following YAML is the definition of one of the virtual machines per lab environment, there are three, one control plane node, two worker nodes with slightly different userdata.
- VirtualMachine Kubevirt definition with userdata to add a custom SSH key for ubuntu user:
apiVersion: kubevirt.io/v1
kind: VirtualMachine
metadata:
  labels:
    kubevirt.io/vm: myvm
  name: controlplane
  namespace: student
spec:
  running: true
    template:
    metadata:
      labels:
        kubevirt.io/vm: myvm
    spec:
      domain:
        devices:
          disks:
          - name: datavolumedisk1
            disk:
              bus: virtio
          - name: cloudinitdisk
            disk:
              bus: virtio
        resources:
          requests:
            memory: 1.5Gi
          limits:
            memory: 1.5Gi
        cpu:
          cores: 1
          threads: 2
      terminationGracePeriodSeconds: 0
      volumes:
      - name: datavolumedisk1
        containerDisk:
          image: "quay.io/containerdisks/ubuntu:22.04"
      - name: cloudinitdisk
        cloudInitNoCloud:
          userData: |
            #!/bin/bash
            echo "ssh-rsa public key" >> /home/ubuntu/.ssh/authorized_keys
- Create a service that provides SSH access to the VM.
apiVersion: v1
kind: Service
metadata:
  name: ssh
  namespace: student
spec:
  externalTrafficPolicy: Cluster
  ports:
  - name: nodeport
    port: 27017
    protocol: TCP
    targetPort: 22
  selector:
    kubevirt.io/vm: myvm
  type: NodePort
- Direct SSH access using the custom SSH key:
$ kubectl get svc -n student
NAME   TYPE       CLUSTER-IP     EXTERNAL-IP   PORT(S)           AGE
ssh    NodePort   10.43.79.225   <none>        27017:32322/TCP   111m

$ ssh -i ~/.ssh/student ubuntu@$HOST_PUBLIC_IP -p 32322
...
ubuntu@controlplane:~$ ls /
bin  boot  dev  etc  home  lib  lib32  lib64  libx32  lost+found  media  mnt  opt  proc  root  run
How it works Kubevirt?
A KubeVirt virtual machine is a tool that allows running virtualized instances within the Kubernetes ecosystem. Essentially, a KubeVirt virtual machine is a Pod that is tightly coupled with a QEMU virtual machine instance.
There are several components to Kubevirt, but I will focus on two important ones for my use case: VirtualMachine and VirtualMachineInstance. Both of these are deployed as Custom Resource Definitions (CRDs) to the host Kubernetes cluster.
- VirtualMachineInstance: This component is created by VirtualMachine component and is directly responsible for the QEMU virtual machine instance. It is an ephemeral part of Kubevirt and is deleted when a VM is deleted. Typically, it is not created on its own but rather using the VirtualMachine CRD or VirtualMachineInstanceReplicaSet CRD.
- VirtualMachine: This component extends the capabilities of VirtualMachineInstance by providing functions for stopping and starting, as well as storing VM data and state.
When a new VirtualMachine definition is added to the Kubernetes API, Kubevirt performs the following steps:
- The virt-handler DaemonSet pod spawns a virt-launcher pod.
- The virt-launcher creates a VirtualMachineInstance object.
- The virt-launcher queries the libvirtd API with the translated definition from the VirtualMachine definition.
- The libvirtd starts the QEMU virtual machine.
- Any updates to the VirtualMachine component is reflected onto the QEMU virtual machine instance.
For more detailed information you can visit the official Kubevirt documentation.
Container disks vs PVC
You can run Kubevirt instances on PVCs or container disk images, which are snapshots of an entire operating system mounted as a container.
Initially, I tried using PVCs, but it was cumbersome. I had to create a generic “golden PVC” with all Kubernetes components, and cloning it across namespaces took around 3 minutes. Other platforms can do it instantly!
So I experimented with container disk images. Once these images were pulled onto my Kubernetes cluster, initializing new environments became much quicker, taking around 1 minute and 30 seconds.
Although this was an improvement, it was still too long. To optimize further, I created a cache of ready-to-use tenant environments. This reduced provisioning time to less than 30 seconds, which is acceptable. However, I still plan to make it even quicker in the future.
💡 The cache consists of a database with ready-to-claim environments, running on the host cluster. When a student starts a challenge, the corresponding entry is deleted from the database and the tenant environment is allocated to the student. The cache is refilled using a cron.
Resource consumption with Kubevirt
To optimize resource management for the lab nodes, I increased the CPU limit per node from 100m to 1000m. This adjustment has resulted in faster provisioning and reduced wait times.
In terms of memory allocation, the control plane is allocated 1.5G, each node is allocated 1G, and an additional 100MB per virtual machine instance is consumed for internal containers in Kubevirt. Each lab consumes approximately 3.5-4G of memory and 3 threads. With a 64G machine, it is possible to run around 12 parallel labs, taking into account other components and no miners on virtual machines.
Networking
The networking security is primarily managed through restrictive networking policies. These policies effectively prevent access to other student environments and other Kubernetes components. Only the three Kubernetes components are allowed to communicate with each other, and the student is able to directly communicate with the control plane via SSH or kubeconfig. The student can then decide to hop onto node1 or node2 from the controlplane node.
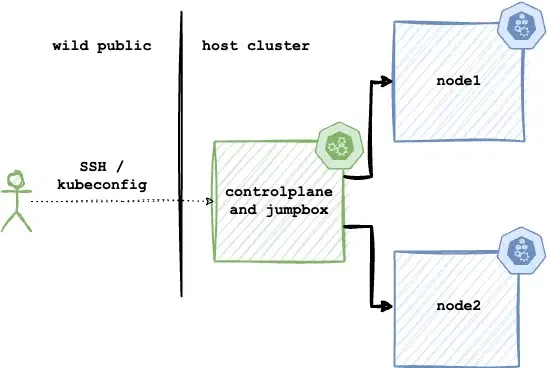
The network topology from students perspective.
Advantages
- Virtualization is the best solution in terms of security for multi tenancy.
- Content, content, content! With OS-level access and Kubeadm installation of Kubernetes, I have the capability to do anything. This was the most crucial aspect for the platform.
Cons
- Tenant density is much lower with Kubevirt as runs complete operating systems with Kubernetes components.
- Startup time is much slower as it’s a full blown operating system.
- Does not have syncer, so I have to write one!
- I had to use bare metal servers to host the labs, since nested virtualization is not allowed by many hyper scalers, and if it is it’s expensive!
Tenant Kubernetes distro
The operating system is Ubuntu 22.04. And as for Kubernetes distribution, I have decided to use Kubeadm for installing Kubernetes on the tenant environments. Initially, I planned to use k3s or its variants, but I realized that if I wanted to intentionally cause issues in k3s, the k3s binary would simply not start. Therefore, troubleshooting k3s might involve finding the correct k3s command, which is not the focus of the content I wanted to create.
My intention is to teach people how Kubernetes works by intentionally breaking various layers, from the operating system to individual components of Kubernetes. The Kubeadm distribution was the only option I could think of that allowed me to achieve my vision.
Conclusion
Overall, my decision was based on the content I can provide to my students, without considering the drawbacks of the technology used. While Kubevirt may not be perfect, particularly in terms of resource consumption, I can alleviate it by allocating a slightly higher budget each month. I could easily run it on a large bare metal server from Hetzner auction for less than 50 euros per month, which would provide me with sufficient RAM and processing power. I ultimately concluded that while Kubevirt may have some drawbacks, it allows for more flexibility in providing learning content and offers better security through virtualization.
Challenges
My biggest challenge has been, and still is, having knowledge of various technologies but struggling to effectively integrate them. I have conducted experiments on technologies I am familiar with, encountered roadblocks, and then moved on to other technologies, wasting a lot of time. While everything is functioning well, I believe there is huge room for improvement.
💡 For example, I experimented with using Packer to build golden images for Kubevirt for lab environments after abandoning vCluster. However, I later decided to abandon Packer as well since I was already using the Ansible provisioner and didn’t require an additional tool alongside Ansible.
Currently, I am enhancing the infrastructure based on feedback from students and my backlog which is ever growing. However, progress is slow due to the diverse tasks related to content, user experience, Slack bot, marketing, security and various other tasks. I constantly have to switch and juggle between these tasks. There are almost 70 tasks in my queue, making it a large side project alongside my full time job.
I am now realizing that Slack may not be the ideal tool for building a community. It is more suited for team collaboration and has limitations on API calls for free accounts. Additionally, its pricing is based on every Slack member, which would be costly if I wanted to access API calls that are only available for paid accounts, especially considering my growing community of students in my Slack workspace.
Future Development
- NodePorts are created when a lab is created, resulting in multiple NodePorts being opened on the host cluster of all tenants that are waiting to be claimed. This raises security concerns, as even though an attacker may only potentially exploit a tenant environment, it could negatively impact the experience of users who genuinely want to learn.
- Network bandwidth limitations per tenant serve as an additional measure to prevent misuse of the platform. There is a mechanism, described here, that can be used for this purpose.
- Create a custom syncer for my use case. This could be an app deployed in each tenant namespace, monitoring for new services or ingress objects within the tenant environment and replicating them onto the host cluster. For instance, the student creates a NodePort service that is replicated to the host cluster through my syncer.
The network topology from students perspective.
- Many labs do not require three nodes; in fact, most of them only need one node. Therefore, it would be beneficial to have dynamic environments. One approach could be to maintain a cache of nodes waiting to join a control plane and assign them when requested. I have experimented with this before, but it was not successful due to the immaturity of the platform. I will revisit this idea when resources become scarce.
- Currently, cached labs are only available for one Kubernetes version and not for others. This means that provisioning all learning content takes around 20-30 seconds, but sandboxes take 1.5 minutes. I would like to cache multiple versions to speed up the provisioning of sandboxes as well.

